Interior


#5
 08-31-2006, 09:15 PM
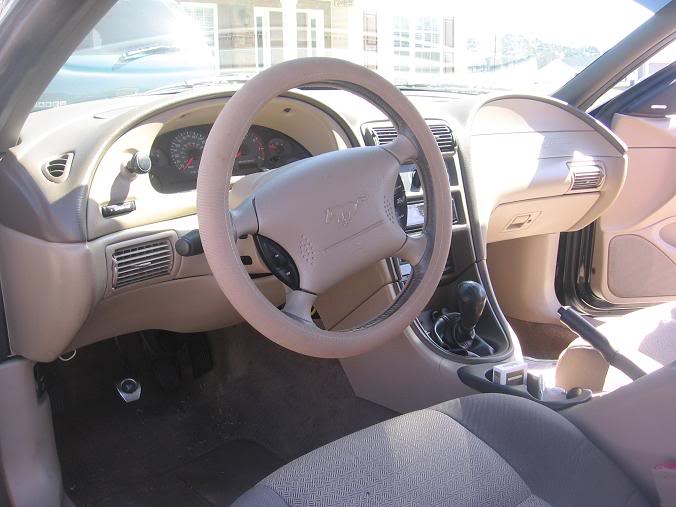
I simply got the 03 Cobra seats (w/tan inserts) and it totally changed my "peanut butter" interior.

#7
08-31-2006, 09:19 PM
Originally Posted by 02LaserRedGT
I simply got the 03 Cobra seats (w/tan inserts) and it totally changed my "peanut butter" interior.
#9
08-31-2006, 09:25 PM
Originally Posted by 02LaserRedGT
dont mind the dirty floor mat


you did it...
I have never seen that in my life...
perfect job... looks awesome... the 1rst and only tan interior i have ever liked

#10
08-31-2006, 09:33 PM
thanks. The front seats came off a friend's 03 Cobra vert. He replaced them with Corbeaus so I got these. Still have the stockers in the rear but they match the tan suede inserts PERFECTLY, so it doesnt look bad at all.
I've looked for aftermarket seats to match the tan interior but couldnt find anything I liked. I wasnt sure how this would look but it turned out much better than expected. I've already gotten many compliments on them at a previous car show I attended. I'll eventually get the 03 rear seats but I'm in no hurry now. At least you guys get the idea how this look.
I've looked for aftermarket seats to match the tan interior but couldnt find anything I liked. I wasnt sure how this would look but it turned out much better than expected. I've already gotten many compliments on them at a previous car show I attended. I'll eventually get the 03 rear seats but I'm in no hurry now. At least you guys get the idea how this look.
#11
09-01-2006, 06:24 AM

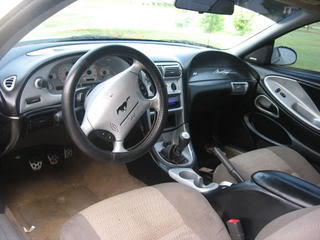
I took a different route with my tan interior....I hated it, so I changed it using Duplicolor paint. Still have to do the seats, carpet and headliner and I will be done. I'm going to get my friend to recover the seats with black leather and silver suede inserts, just like the Cobra seats, just a Whoooooooooole lot cheaper.

 ..
..
#14
09-01-2006, 09:45 AM
Guest
Posts: n/a
Originally Posted by TClark22
RABBIT...that is exactly what i want to do...
list what u used and exactly how you did it
list what u used and exactly how you did it
I cant ever see me painting my interior, I rather find a set on ebay or something. But I would have to see yours in person rabbit. Like you would deff need a paint gun to have it look like factory. Any little "drips" or anything and your cars going to look like ***.
#15
09-01-2006, 09:47 AM
Originally Posted by SpinMedia
Patients.
I cant ever see me painting my interior, I rather find a set on ebay or something. But I would have to see yours in person rabbit. Like you would deff need a paint gun to have it look like factory. Any little "drips" or anything and your cars going to look like ***.
I cant ever see me painting my interior, I rather find a set on ebay or something. But I would have to see yours in person rabbit. Like you would deff need a paint gun to have it look like factory. Any little "drips" or anything and your cars going to look like ***.
thats why i said check junkyards
#16
09-01-2006, 09:52 AM

Originally Posted by SpinMedia
I cant ever see me painting my interior, I rather find a set on ebay or something. But I would have to see yours in person rabbit. Like you would deff need a paint gun to have it look like factory. Any little "drips" or anything and your cars going to look like ***.
He didnt, he used a penetrating dye... works differently, also works on leather. So he literally dyed his vinyl black, like the factory would, he cant change it back(save finding tan vinyl/leather dye) or peel or chip the paint off, the vinyl IS that color now, not just the outside. However, the silver details he did (srs and Mustang) Might have been paint, and risk cracking... but its unlikely.
EDIT: Apparently I lied, and was thinking of someone else X_X using VHT stuff..
#17
09-01-2006, 09:54 AM
Clean the **** out of it with Rubbing Alcohol
Then use Duplicolor Adhesion promoter exactly how it says on the instructions.(vital step to keep from flaking/peeling)
Then I used Duplicolor "VInyl & Carpet" Paint. Several Coats.
I haven't cleared any of it yet. When I replace my heater core and have to take the entire dash out, I am going to repaint the entire dash. I painted it in the car so not all of the edges got a good coat of paint.
Just be sure to use steady strokes and you won't have any problem with running or dripping paint. Take your time and you can make it look damn good.
I still have a few areas to touch up, but I am going to wait until I get my carpet, and seats. That way pretty much everything will be out of the car and I can get everything perfect!
#19
09-01-2006, 11:31 AM
Originally Posted by TClark22
lol i wouldnt know even how to begin to take out the parts i want to paint...
and how the heck did u do it in ur car and not get overspray?
and how the heck did u do it in ur car and not get overspray?
a **** load of news paper and tape.
#20
09-01-2006, 11:44 AM

my interior used to be tan also...
dyed the interior black and replaced the seats with racing seats.

greg, its almost impossible to find parts for a mustang at a junk yard...
here's another

dyed the interior black and replaced the seats with racing seats.
greg, its almost impossible to find parts for a mustang at a junk yard...
here's another


#26
09-02-2006, 07:21 PM
Guest
Posts: n/a
Originally Posted by tennstang
Does the dash assembly not have to come out when the gauges are replaced? I see alot of folks with while gauges and what not...
just curious.. I've never researched it.

just curious.. I've never researched it.


#28
09-02-2006, 08:01 PM
Guest
Posts: n/a
It's pretty Simple....
There are two bolts at the top of the gauge bezel, you pop those out and pull up and forward and the bezel will pop off. (don't forget to pull the headlight/ dimmer handle off first.)
After that, you will need a small ratchet with an extension and I believe there are 5 or 6 small bolts holding the gauge cluster in.
Pull the cluster out and unplug it and that's it.
Then to take the cover off there are several small bolts something like 6 or 8, just loosen em' up and pull em' off...
#29
09-02-2006, 08:12 PM
Cool.. thanks. I found this http://www.mustangtuning.com/mustang-gauges-how-to.html
It mentions that some kits will need additional power. That sounds ugly.

It mentions that some kits will need additional power. That sounds ugly.
#30
09-03-2006, 09:46 AM
my guages needed to be tapped into another wire for power in order for them to turn the color ot blue...
all i did was take the red wire and soldered it to the white with brown striped wire or maybe the all brown wire and then grounded the black wire in a safe spot...not that hard
but my guages are up for sale if anyone wants them
BUT SERIOUSLY...TELL ME THE EXACT PRODUCTS, WHERE TO GET THEM, AND STEPS I SHOULD TAKE IN DOING THIS INTERIOR PAINTING